⭐ Omg, what is happening?
As technology continues to evolve, so do the security risks associated with it. Recently, several critical vulnerabilities have been discovered in VMware ESXi, which is a popular virtualization platform widely used in enterprise environments. The vulnerabilities, designated as CVE-2022-31696, CVE-2022-31697, CVE-2022-31698, and CVE-2022-31699, can potentially lead to remote code execution (RCE) on affected systems.
These vulnerabilities can allow an attacker to execute arbitrary code on a remote host, potentially compromising the system and leading to data theft and other malicious activities. In some cases, the attacker can even gain complete control over the affected system, leading to a significant impact on the security and stability of the affected systems.
The affected versions of VMware ESXi include 6.7 and 6.5, and it is important to note that these vulnerabilities have been patched by VMware. Users are highly recommended to update their systems as soon as possible to reduce the risk of exploitation. To further protect against RCE attacks, it is also important to follow best practices for network security and to keep all systems up-to-date with the latest security patches.
In conclusion, the recent vulnerabilities in VMware ESXi highlight the importance of staying vigilant and proactive when it comes to security. By taking the necessary steps to protect your systems and data, you can help ensure the safety and security of your organization. Stay informed and stay safe.
⭐ Hello friends,
First of all, I apologize in advance for this will be a quick and styleless explanation. We are racing against time!
You can't learn everything from ChatGPT. Sometimes you need to share current experience. :)
⭐ A quick solution to protect yourself first
You need to protect your server if it's not yet compromised. This exploit works by using SLP service under the hood so better disable it for now.
			[enesdev@ESXi:~] /etc/init.d/slpd stop

			[enesdev@ESXi:~] esxcli network firewall ruleset set -r CIMSLP -e 0

			[enesdev@ESXi:~] chkconfig slpd off
This command disables the firewall ruleset for the "CIMSLP" service on an ESXi host. The "esxcli network firewall ruleset" is a command-line tool for managing firewall rules on an ESXi host. The "-r" option specifies the name of the firewall ruleset to modify, and the "-e" option sets the enabled state of the ruleset. A value of "0" means the firewall ruleset is disabled, while a value of "1" means it is enabled.
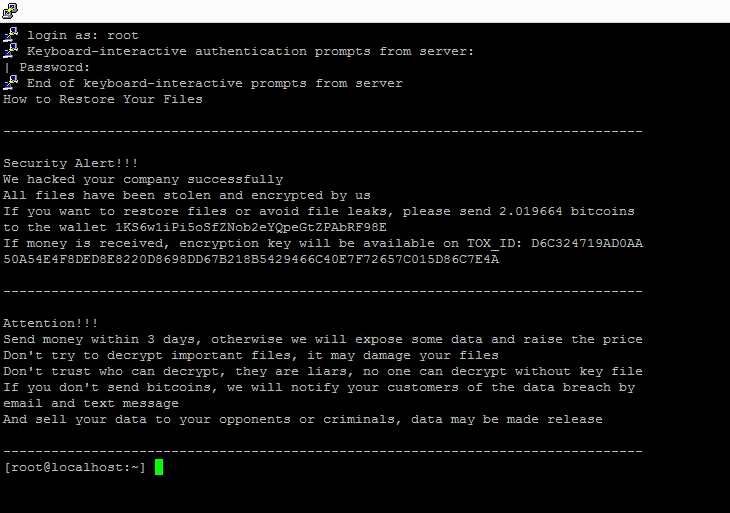
As of 03.02.2023, ESXi 6.x versions were exposed to CryptoLocker virus due to a vulnerability and virtual servers became unusable. For users experiencing this and ended up with crypted vmdk files, I will tell you how to recover the virtual server. The virus encrypts small files like .vmdk .vmx but not server-flat.vmdk file. In ESXi structure, the actual data is kept in flat.vmdk. I will tell you how to make a fallback using flat.vmdk. First of all, when you enter your ESXi server, you will see a warning on SSH like this;
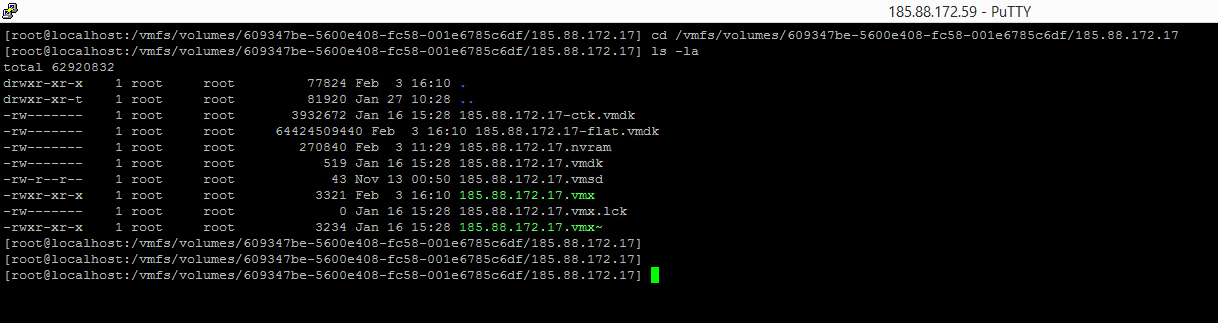
Now reboot ESXi, after booting enter SSH. Enter the folder of the virtual server you want to recover. You enter datastorexxx from FTP, but its name changes to 6094xxx.
After entering the folder, type the command ls -la, here we will get the size of flat.vmdk. It says 64424509440.
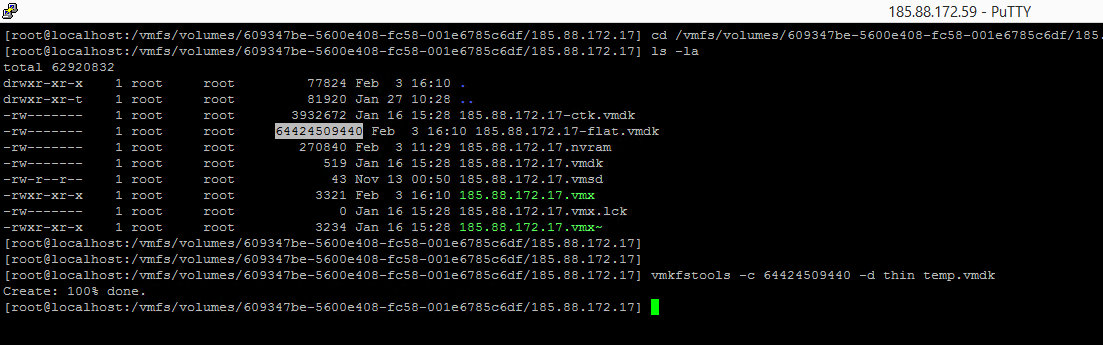
now delete the existing .vmdk file by typing
rm -rf xxx.vmdk NOTE : Delete the xxx.vmdk file. Never delete xxx-flat.vmdk.
Then type the command vmkfstools -c 64424509440 -d thin temp.vmdk. Note that the size of 64424509440 here should be -flat.vmdk when we do ls -la.
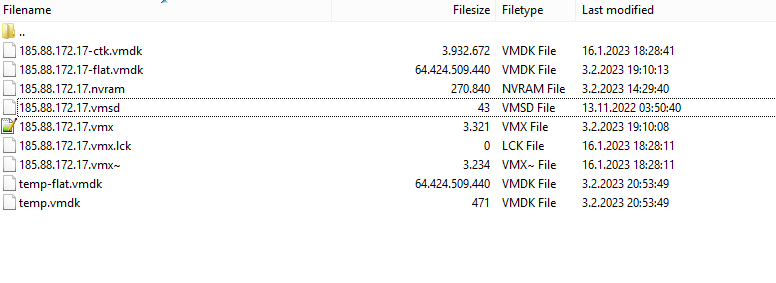
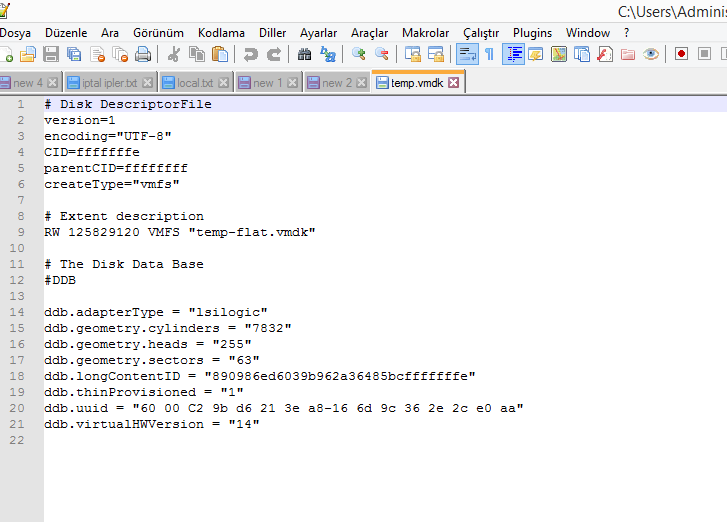
Now when you enter the folder you will see temp.vmdk and temp-flat.vmdk.
Open temp.vmdk with notepad, it will look like above. On line 9 it says "temp-flat.vmdk". We'll replace it with the original -flat.vdmk. My original flat.vmdk name was 185.88.172.17-flat.vmdk, so I edit it accordingly. I'm also deleting the line
ddb.thinProvisioned = "1" on line 19.
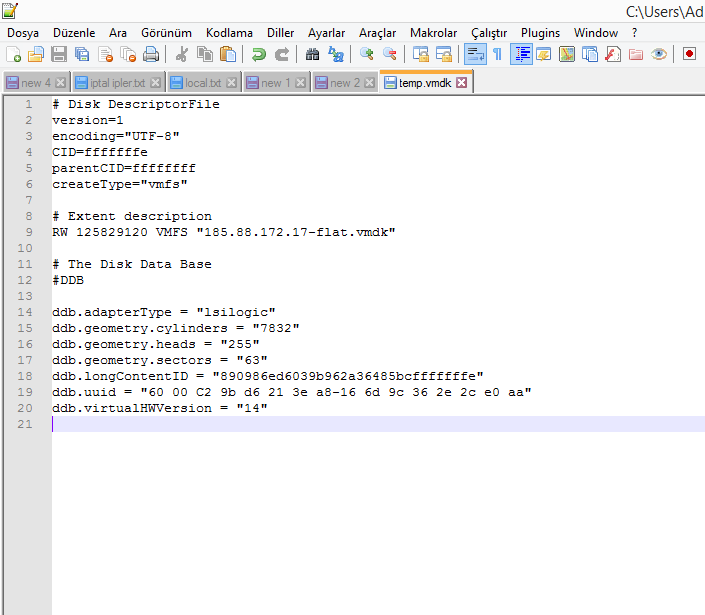
I edited line 9 to "185.88.172.17-flat.vmdk" and deleted line
ddb.thinProvisioned = "1" on line 19. The final version is as in the SS above.
Then go back to FTP and delete temp-flat.vmdk. Rename the temp.vmdk file the same as flat.vmdk. My flat.vmdk name was 185.88.172.17-flat.vmdk. So I changed the temp.vmdk filename to 185.88.172.17.vmdk so I just deleted the -flat line. The final state was as follows
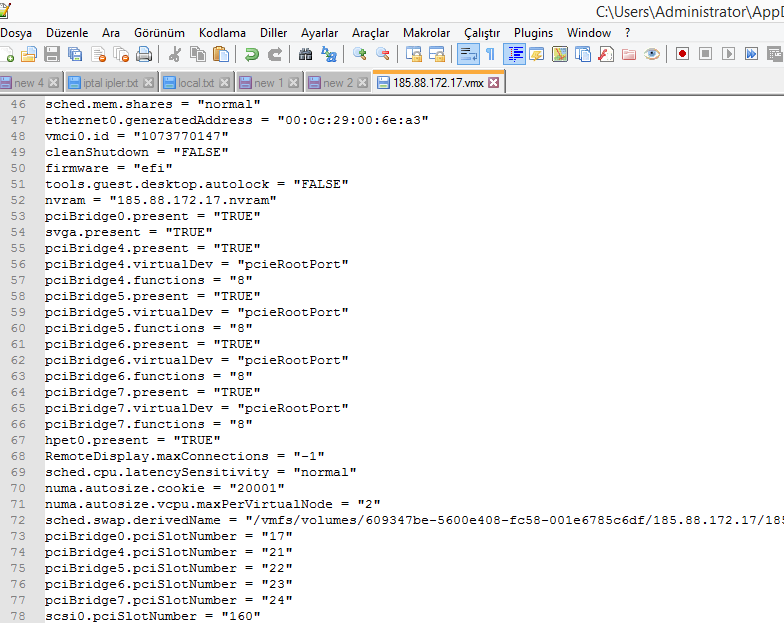
Next we will edit your .vmx file. Since your current .vmx file is encrypted, its backup remains as .vmx~. The file name in my FTP is 185.88.172.17.vmx~. I open it with notepad, take all the codes and paste them into the original .vmx (into 185.88.172.17.vmx)
This is how the .vmx inside works, so I just took the .vmx~ file and made a .vmx.
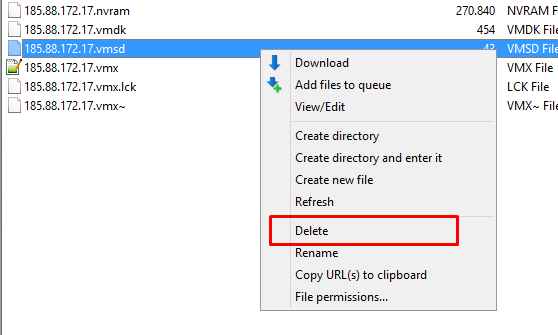
Then go back to FTP and delete the .vmsd file, it's encrypted and corrupt, you don't need it.
Return to the SSH screen and type
vmkfstools -e xxxx.vmdk Do whatever your .vmdk name is.
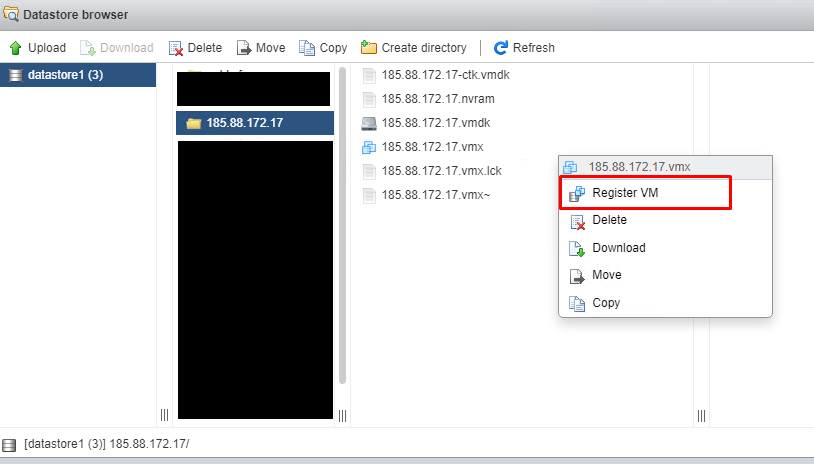
Then enter the datastore in ESXi and right click on xxx.vmx in the folder you edited and make Register VM. If the VM already exists, first right-click it in the Virtual Machines area and Unregister it, that is, remove it from the ESXi interface, then right-click on the .vmx and make it Register VM.
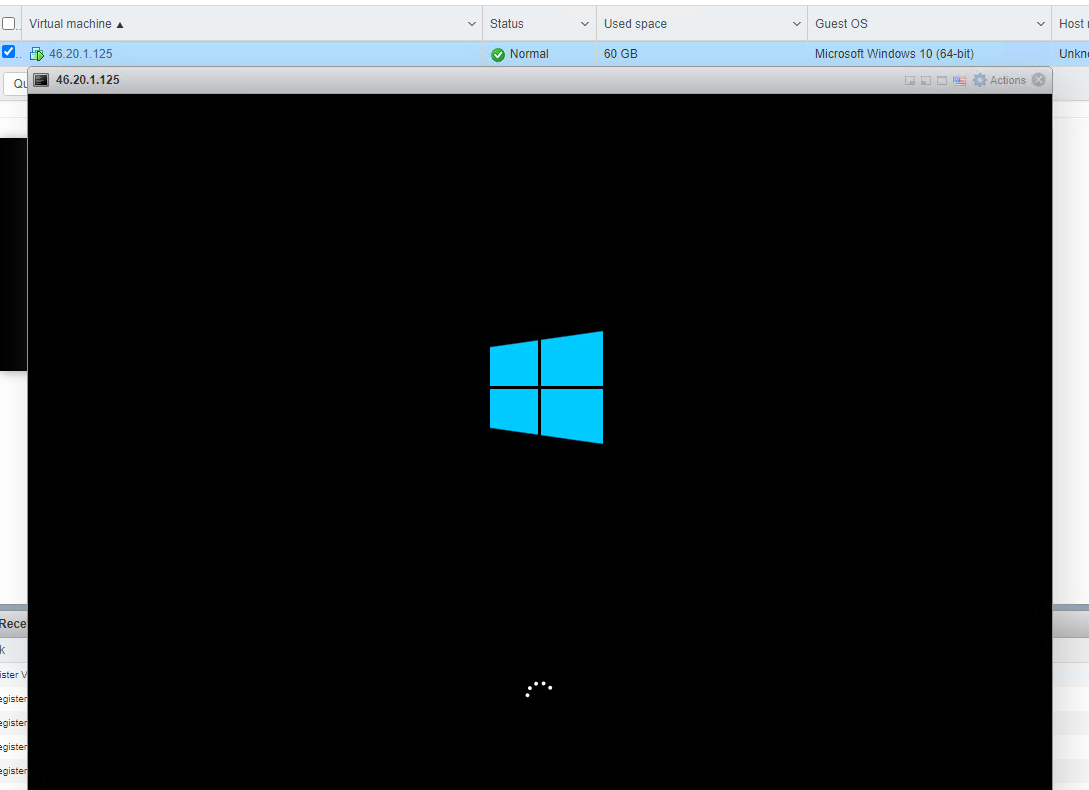
After registering a VM, your virtual server will appear in the ESXi Virtual Machines area and you can open it and use it.
After these processes are finished, do not forget to format ESXi and turn it off. Also update your ESXi with the latest security patches available.
⭐ How to remove banner message on SSH entrance?
Remove or delete contents of /etc/motd file. You can use echo "" > /etc/motd command in short.
Greetings to everyone from Turkey!
Thanks to @mselim from r10, who is owner of siberdc company in Turkey.
⭐ 06/02/2023 - UPDATE!
I noticed that most of you are not able to boot virtual servers due to the failure of the operating system. I will tell you how to get your files from non-boot or non-repaired vmdk.
1. First of all, follow the steps in the article above and repair your .vmdk file. This is a must.
2. Download
WinPE10_8_Sergei_Strelec_x86_x64_2021.10.15_English.iso and save it to a folder on your server.
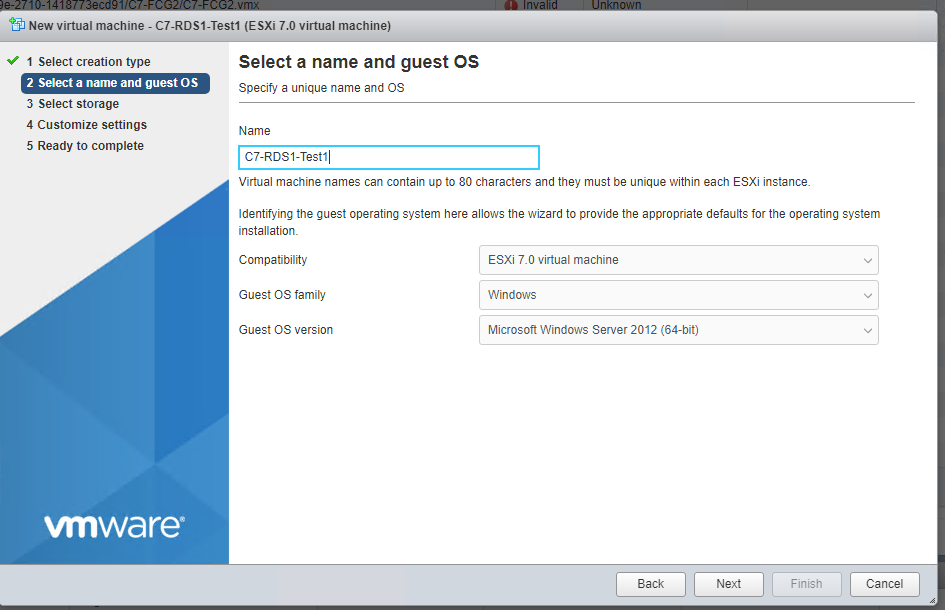
3. Create a virtual server on ESXi. I explain step by step;
Select Windows - Windows Server 2012 as below when creating your virtual server :
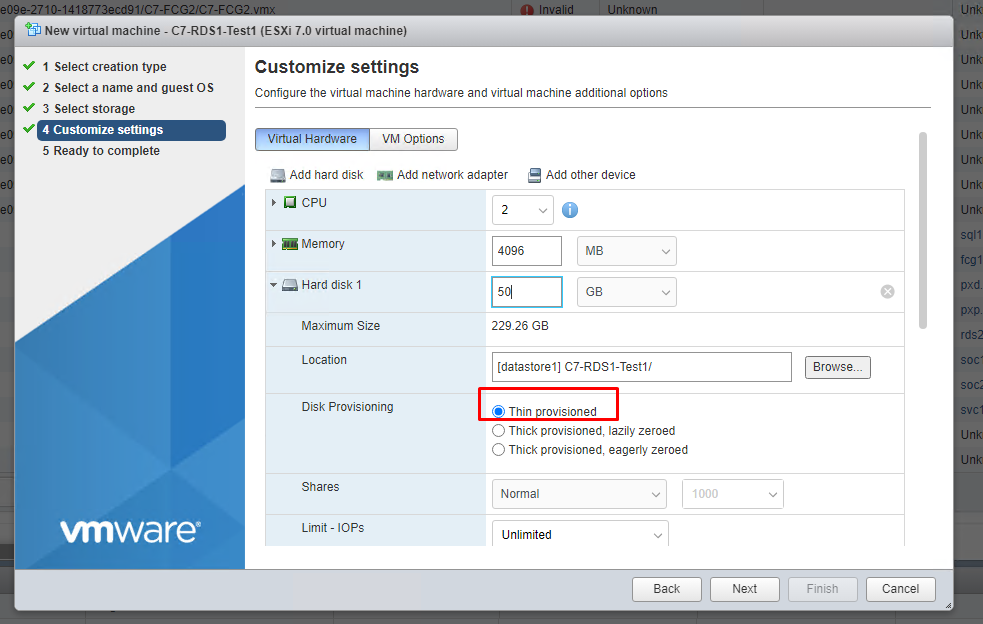
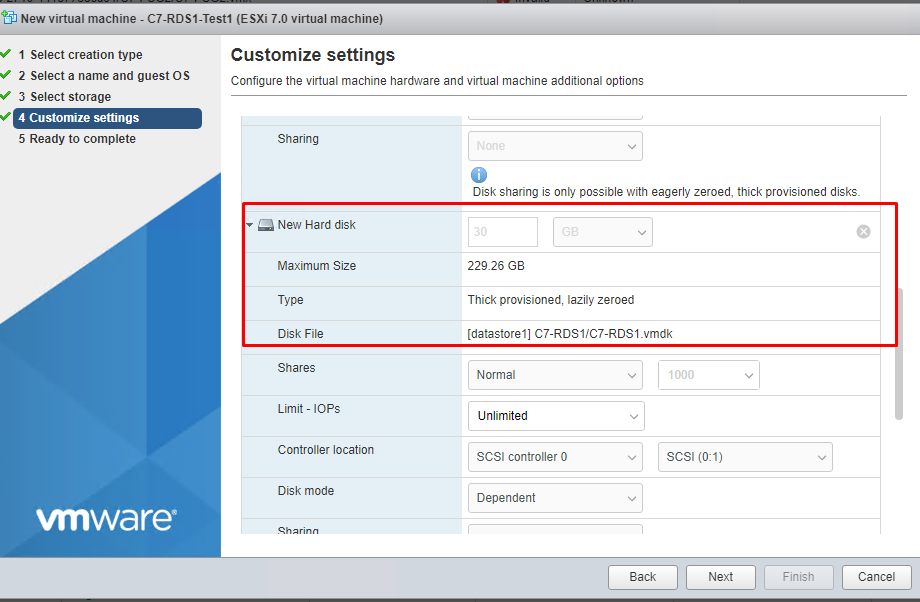
Then select Thin Provisioned in the Hard Disk 1 field as below and make the disk size enough for you. For example, my .vmdk size is 30GB. Since I'm going to throw my files into Hard Disk 1, I made the size 50GB just in case;
Now click on Add Hard Disk field and click Existing Hard Disk
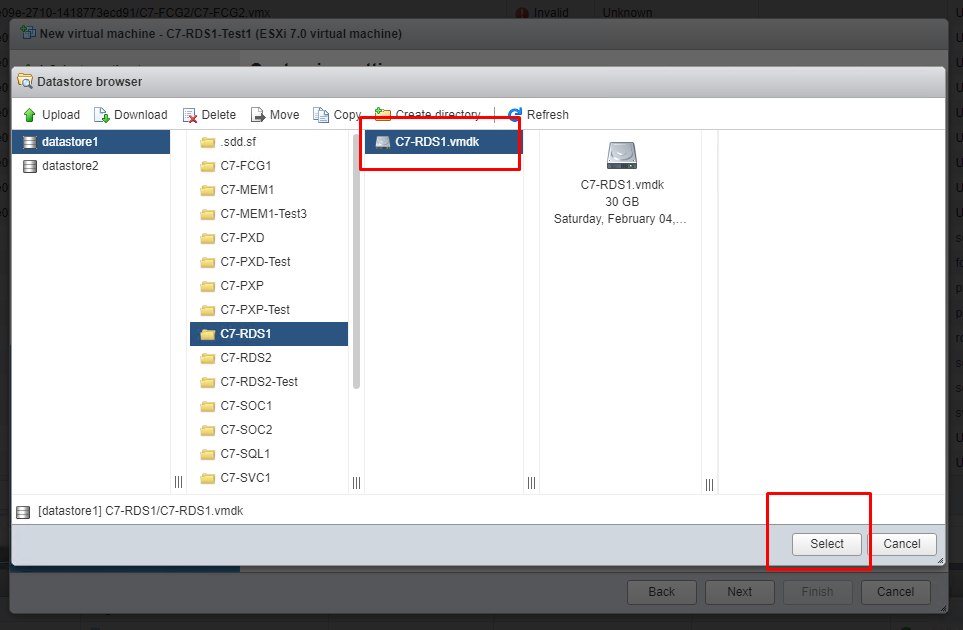
Select the .vmdk we will recover here. My corrupt .vmdk file that I am going to recover is named C7-RDS1.vmdk. I choose it.
As you can see, the .vmdk that I selected as New Hard disk came to my screen.
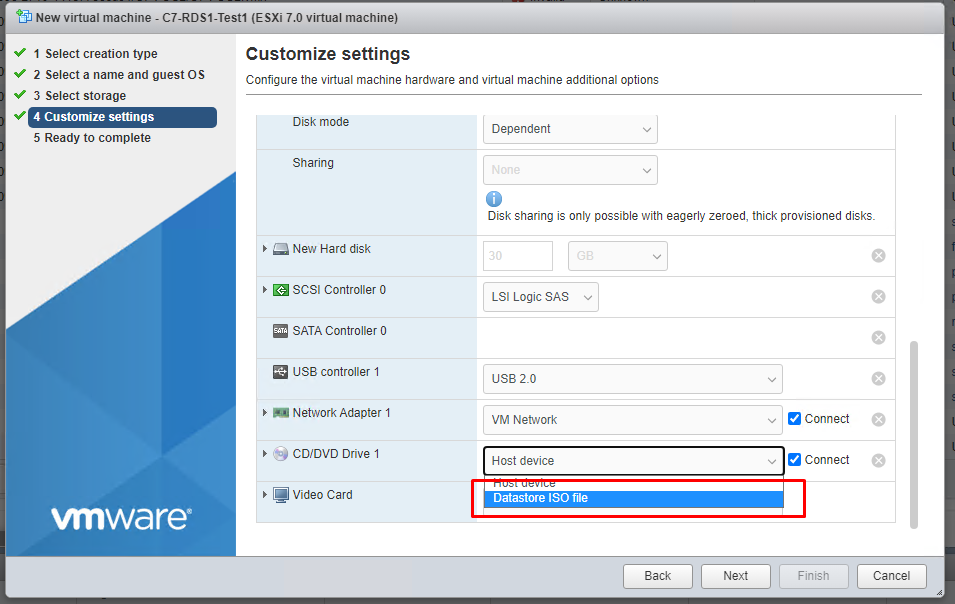
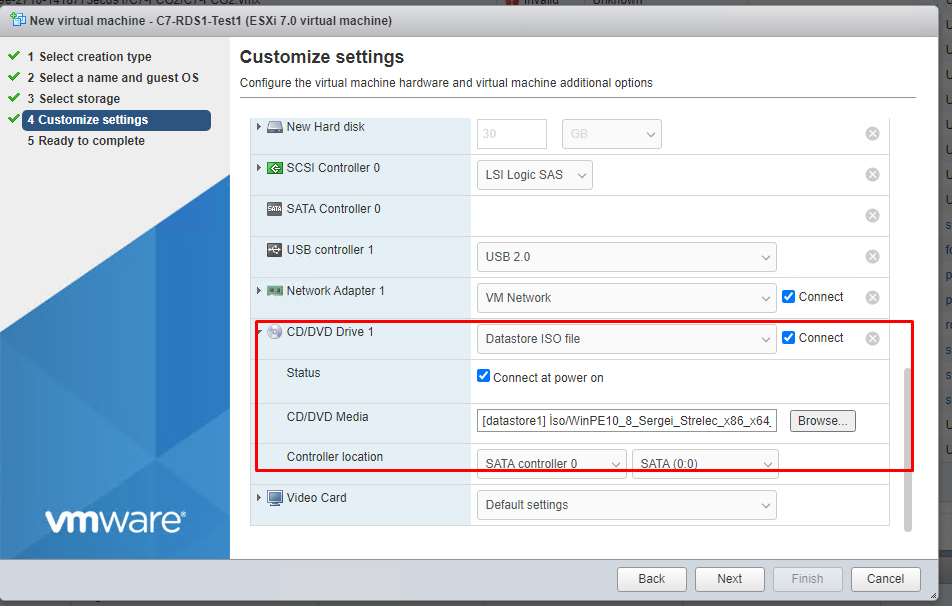
Now click Datastore ISO file from CD/DVD Drive 1
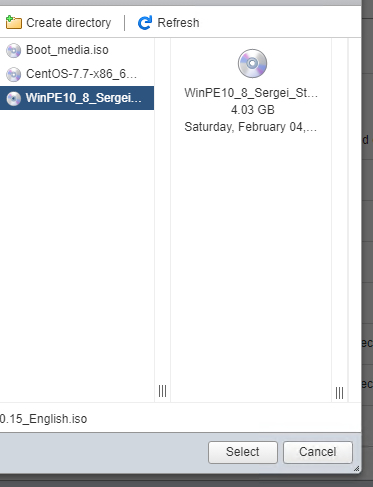
Here we select our Win10_8_Sergei... iso file that we have uploaded.
The final state will be as follows. We chose our ISO file. Connect and Connect at power on options are active. Now we do Next and Finish. Then we start our virtual server and open it.
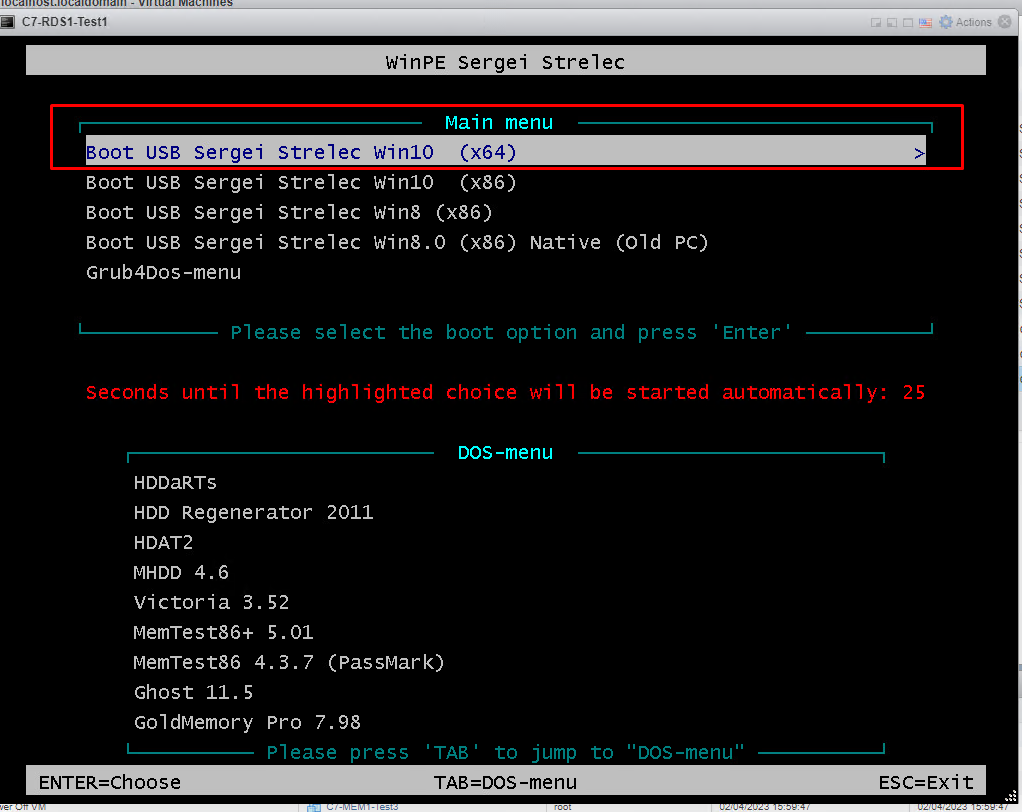
When we open the virtual server, this screen appears. With the Boot USB Sergei Strelec Win10 selected at the top, we continue with Enter.
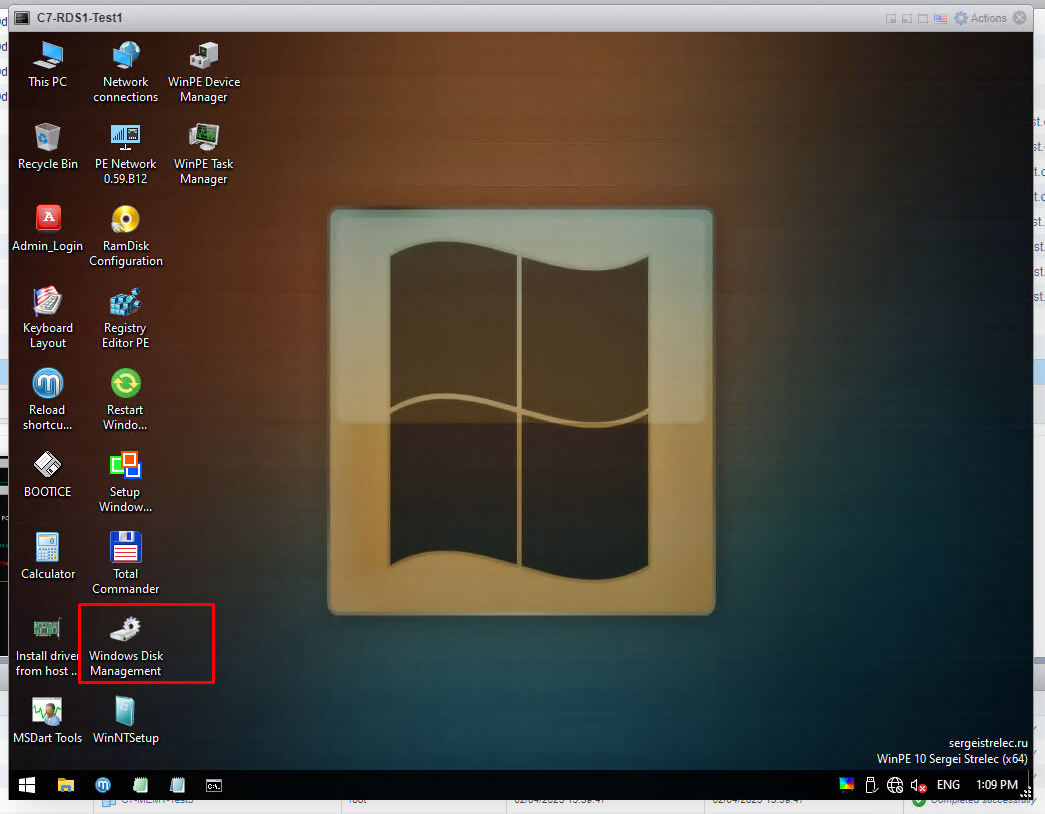
Windows opened. Now we open the Windows Disk Management program on the desktop.
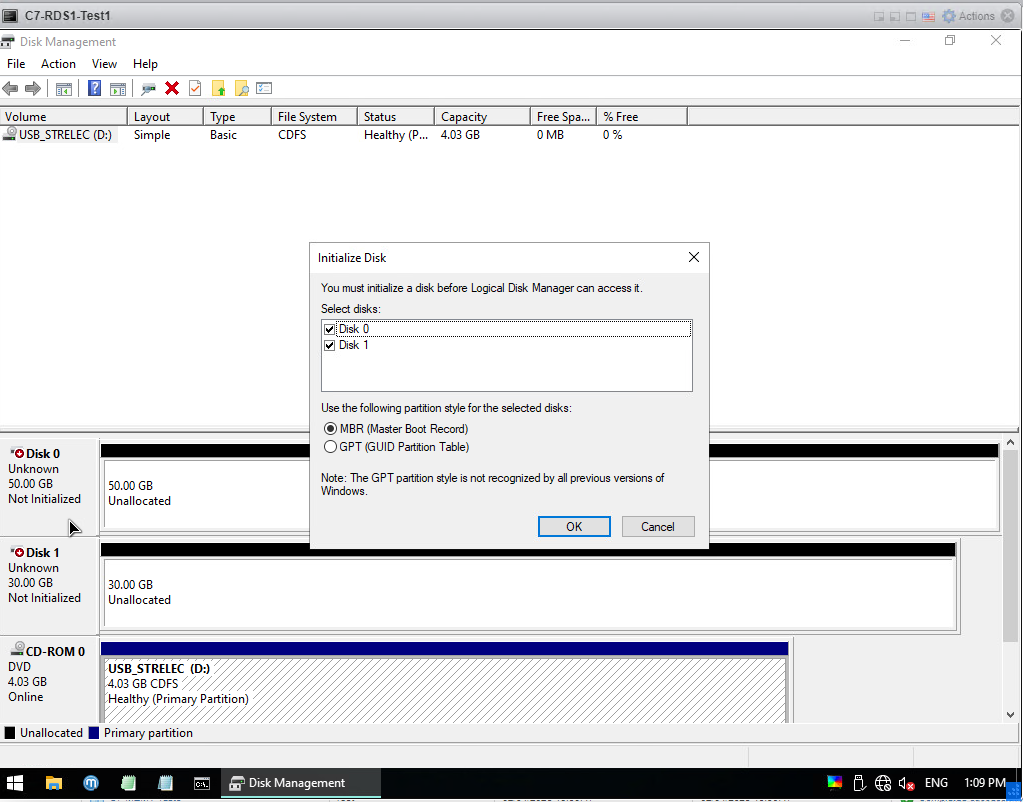
We will see a screen like this, we choose the OK option directly.
As you can see it went online on 2 disks. If you remember, I made 50GB, my new disk, which is Disk 0, where I will take the backups. If the bottom Disk1 is 30GB, it is my .vmdk disk. Be careful here, don't commit to the wrong disk.
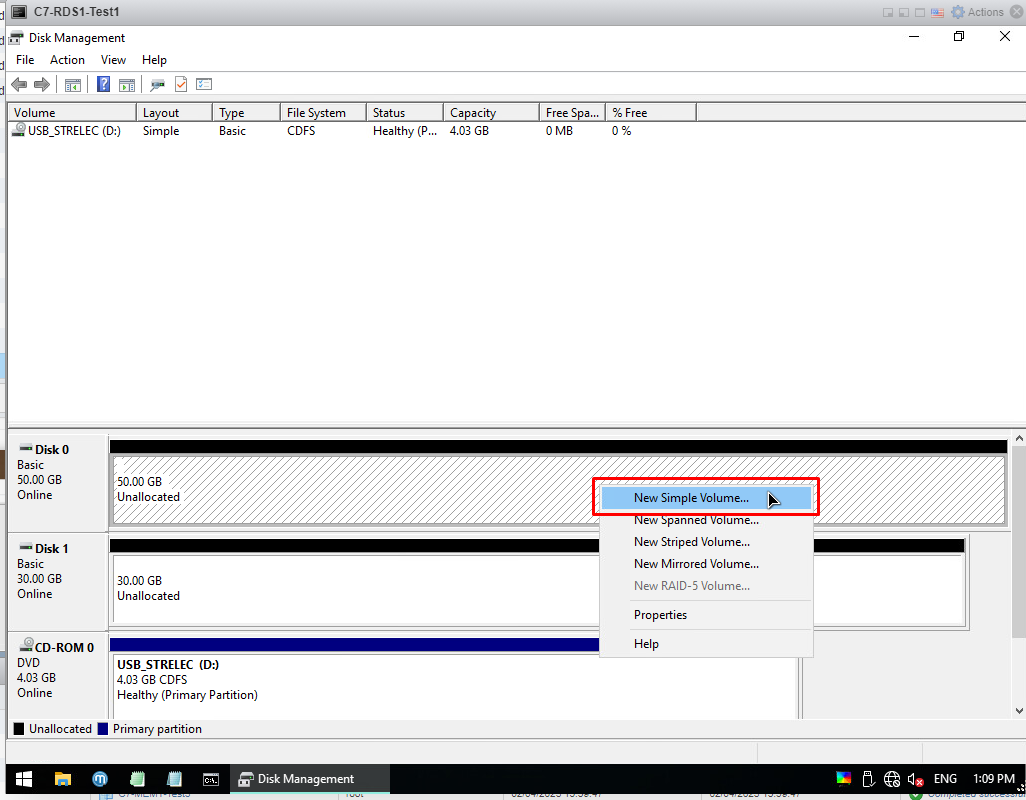
Right click on disk 0 and choose New Simple Volume. I always do next on the screen that appears and I finish it.
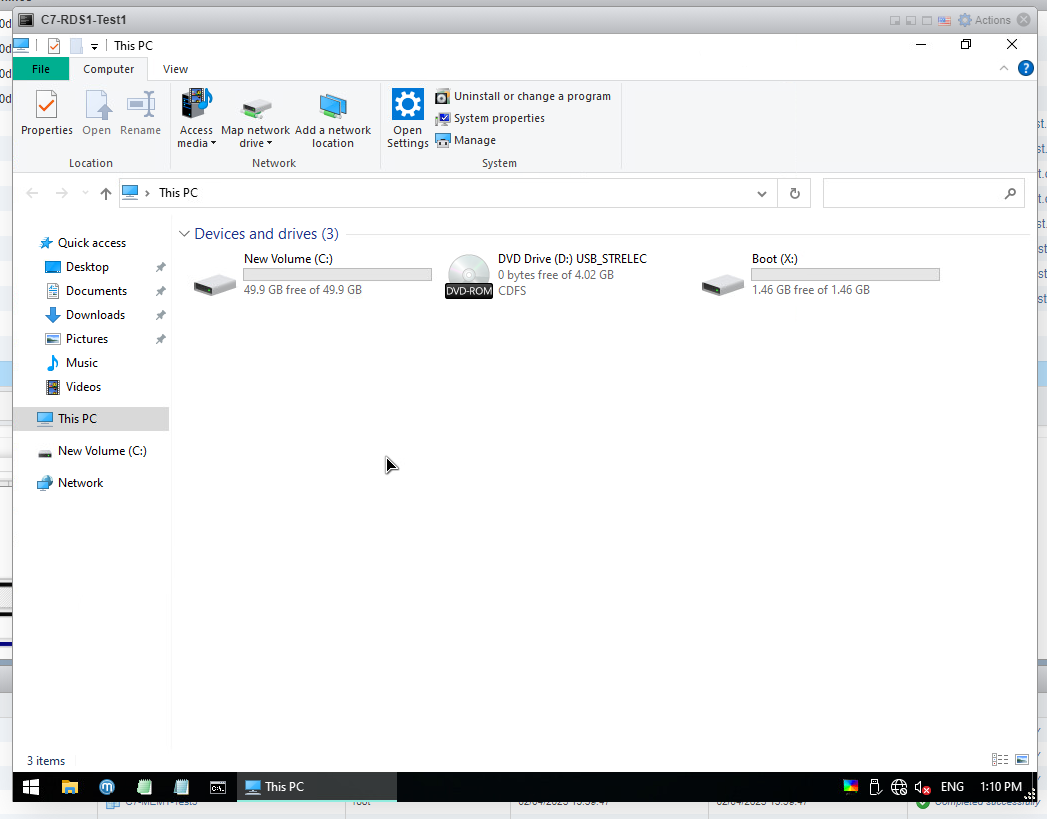
As you can see, I have 50GB of Local Disk C space. Now I will save my files here.
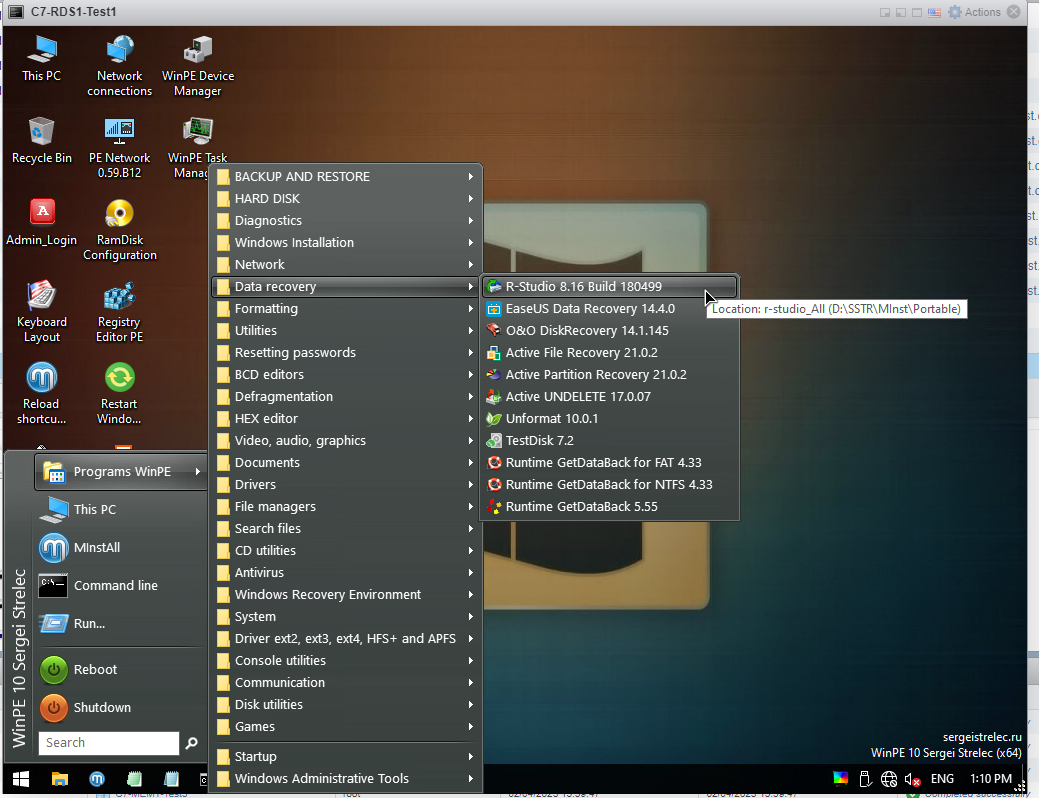
I Click on the Left Bottom Windows Logo > Data recovery > I open R-Studio 8.16.
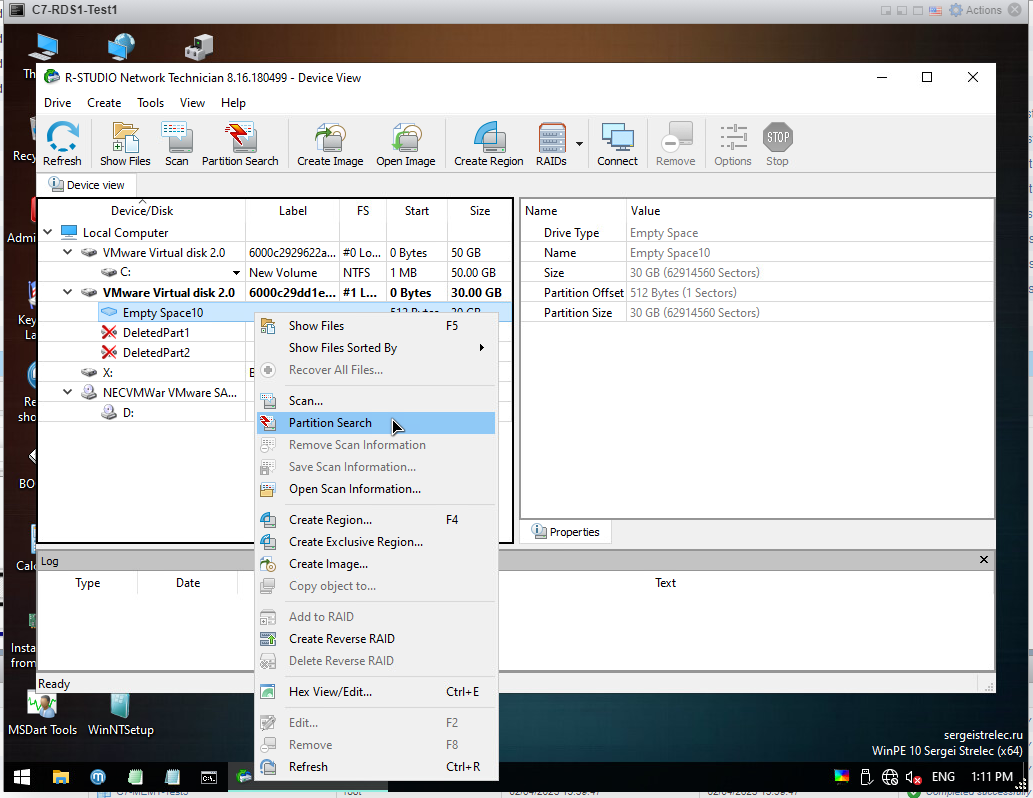
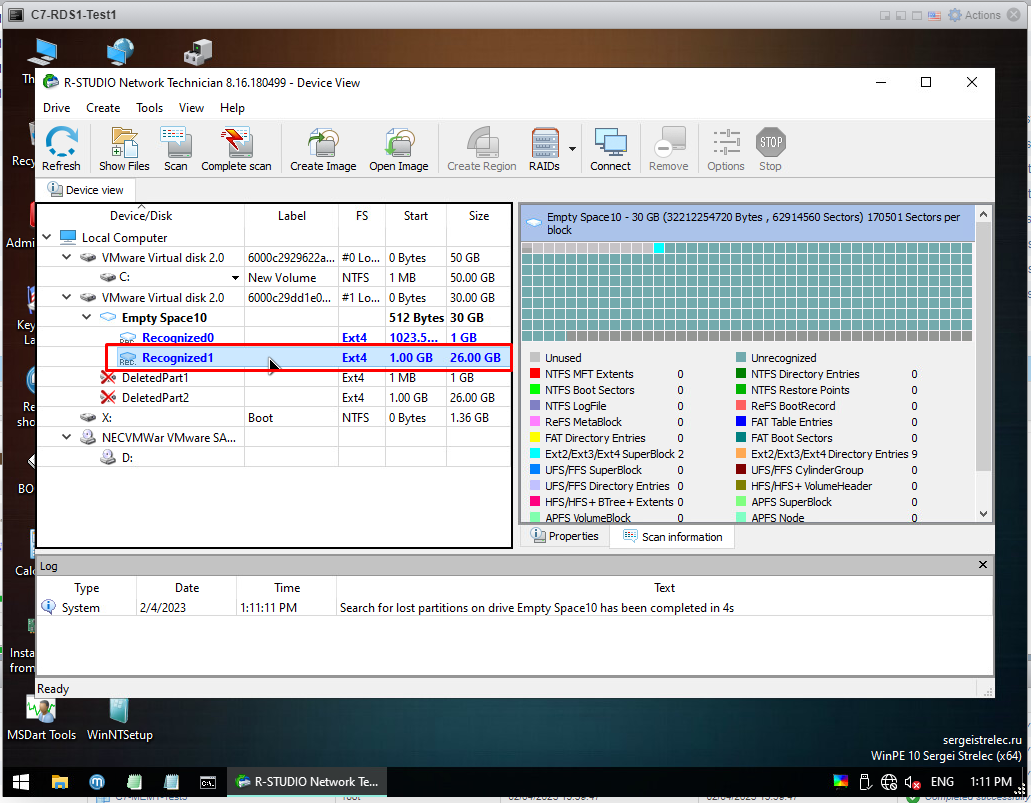
When I open the program, I see a screen like the one below. As you can see VMware Virtual Disk 2.0 is 30GB so this is my .vmdk file. I right click on Empty Space10 (like Size Empty Spacexxx) and do Partition Search.
After the process is finished, a screen like this appears. I have Recognized0 and Recognized1. This number may be too high for you. Double click on whichever is higher. My Recognized1 is 26GB as you can see so my main system is here. I double click on it and open it.
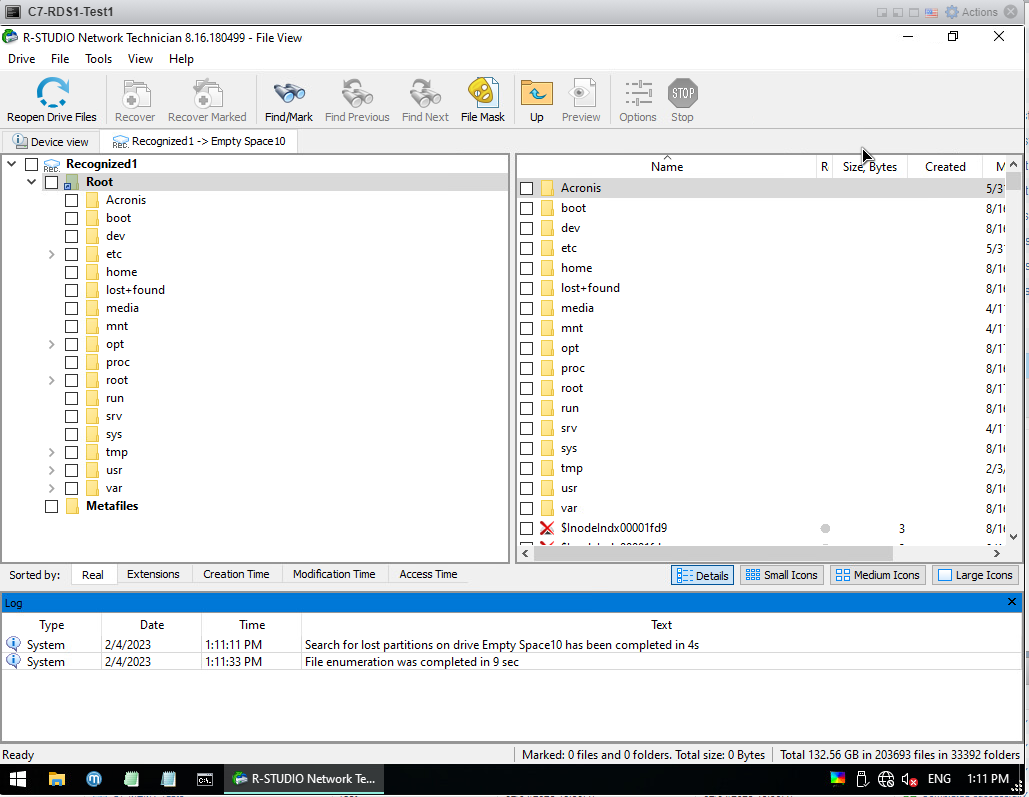
As you can see, .vmdk is opened. Now you can recover any file or complete recovery from here.
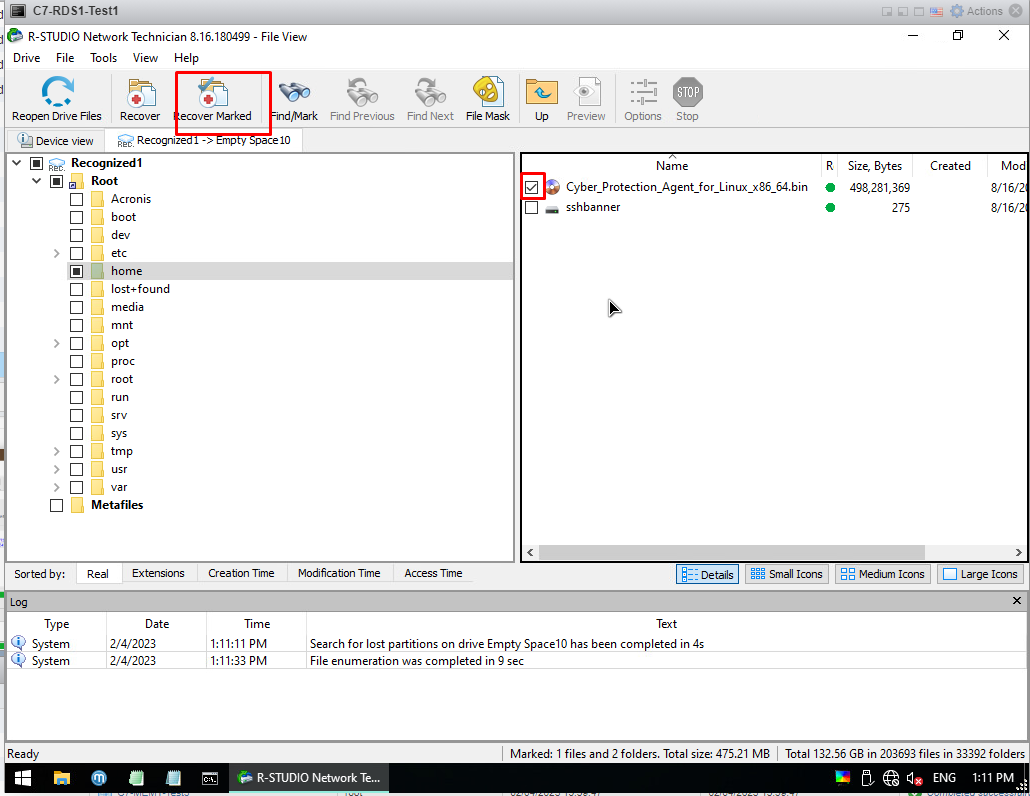
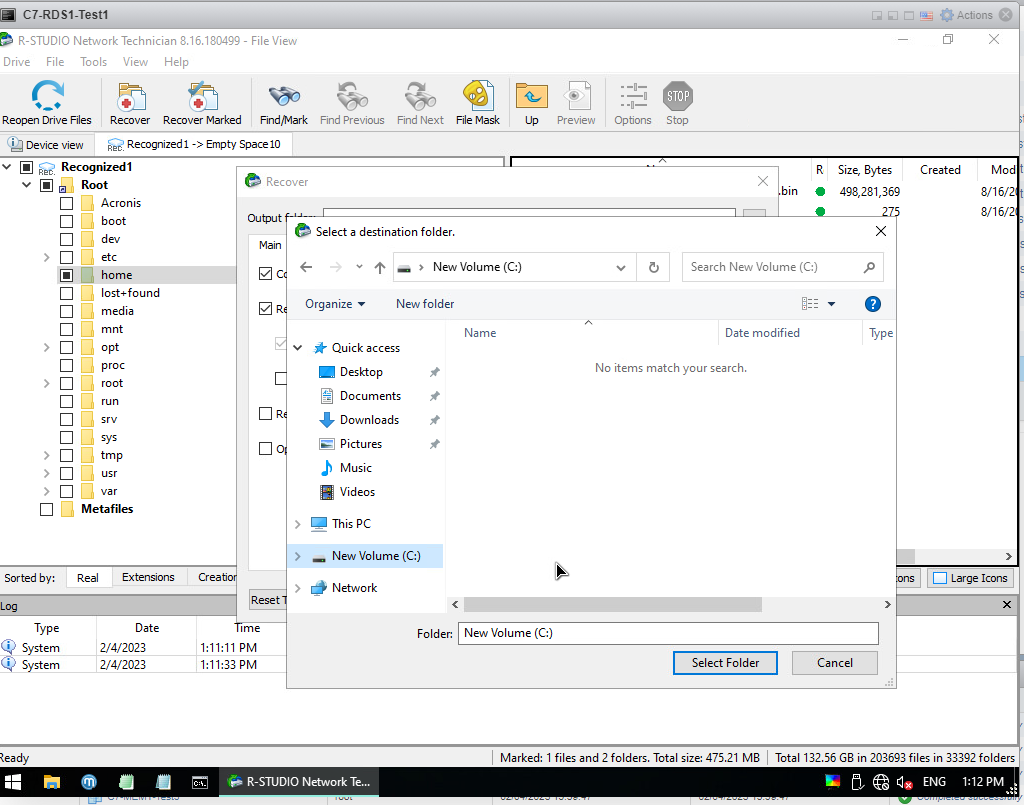
For example, I want to recover only 1 file. There is a .bin file called Cyber in home, I want to import it. I click the box at the beginning of the file I want to recover and click Recover Marked.
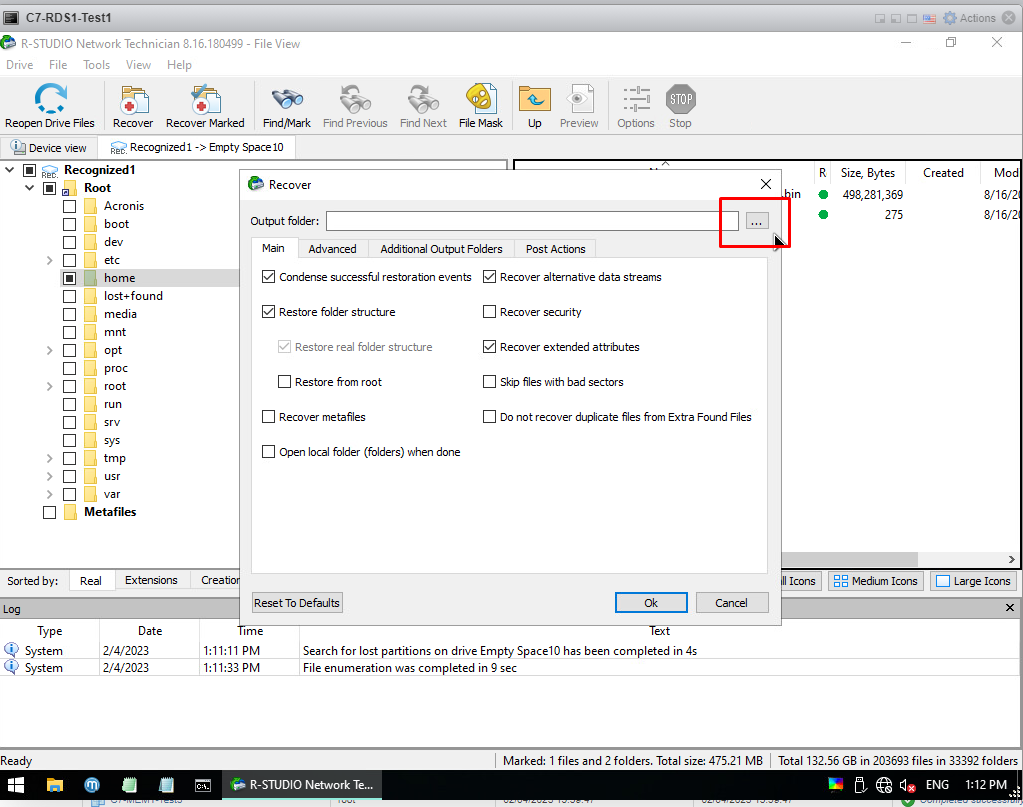
A screen like the one below appears. Output Folder is where I transfer the file. ... I click on the box
From here, I go to Local Disk C and say Select Folder. If you remember, we opened it as 50GB and said that we would transfer the files here. That's why I choose this place.
I chose Output Folder as C:, now I press the Ok button and I'm done.
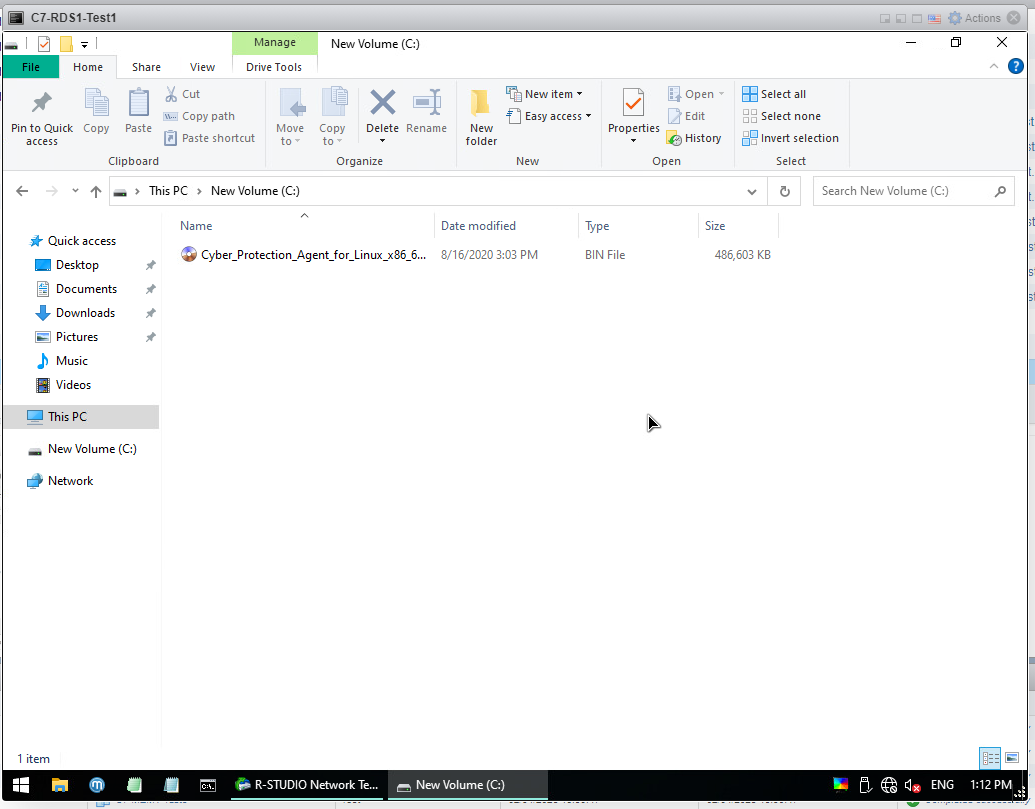
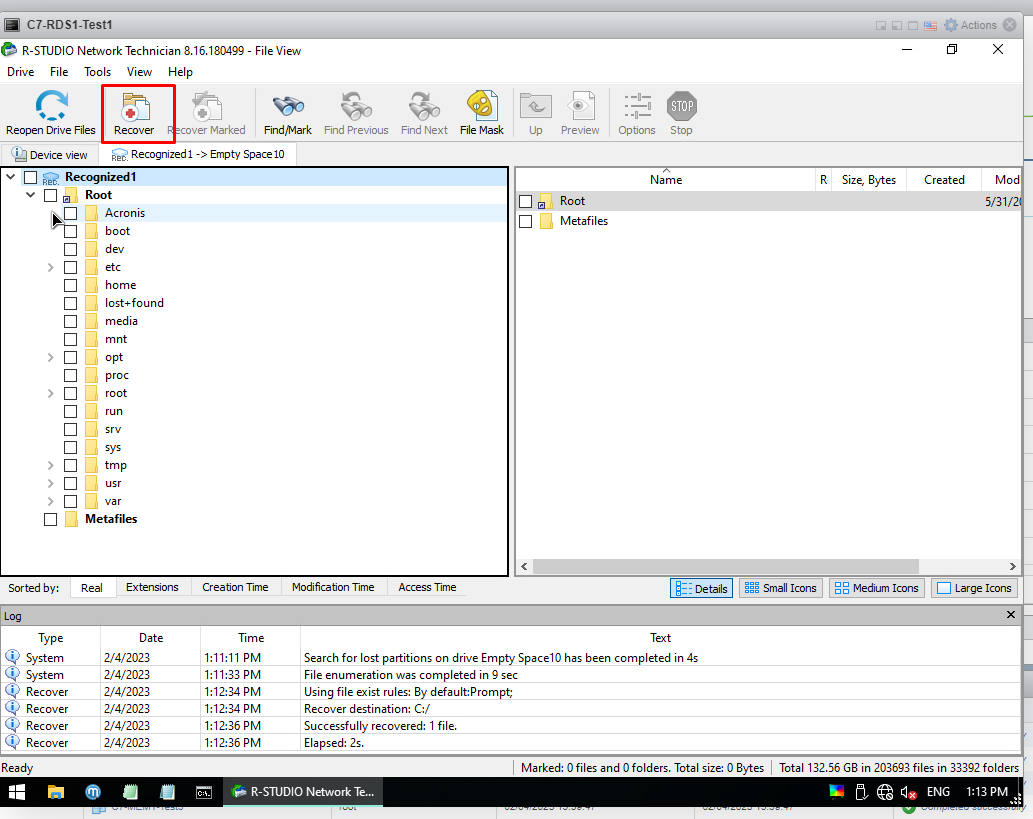
After the process is finished, the file I chose came into Local Disk C as seen.
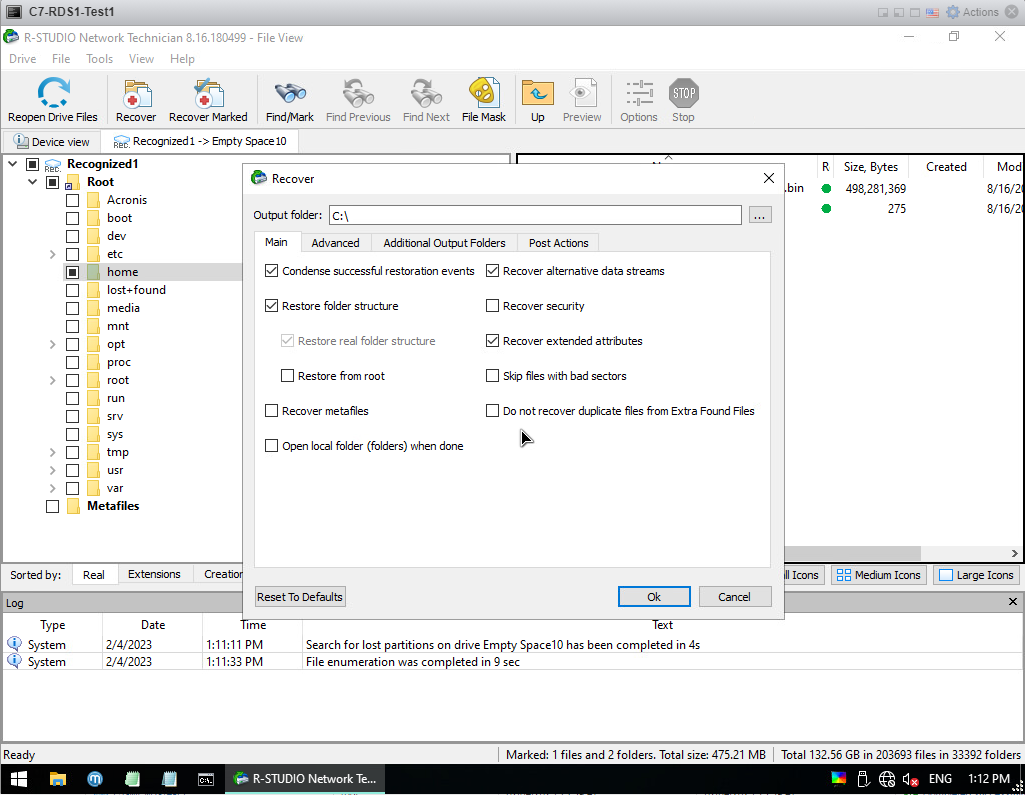
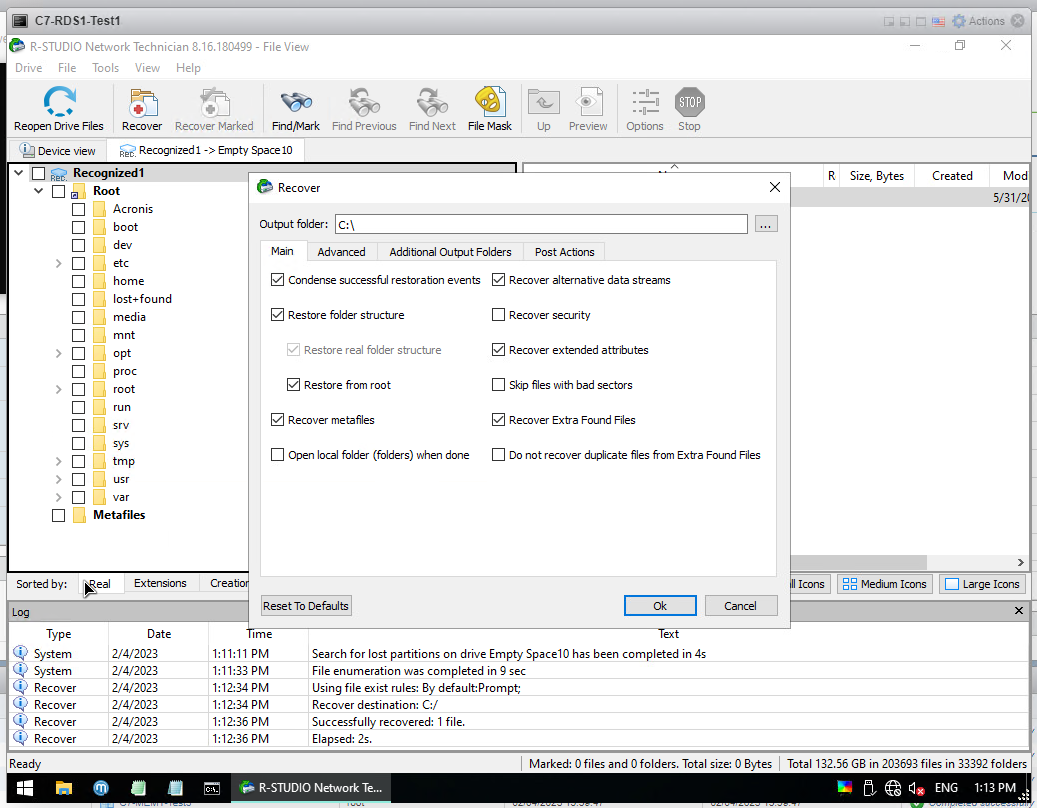
If you want to completely recover all files everything click on the Recover button directly as below.
The Output Folder should be C: in the same way, and tick the boxes as below and finish with "OK".
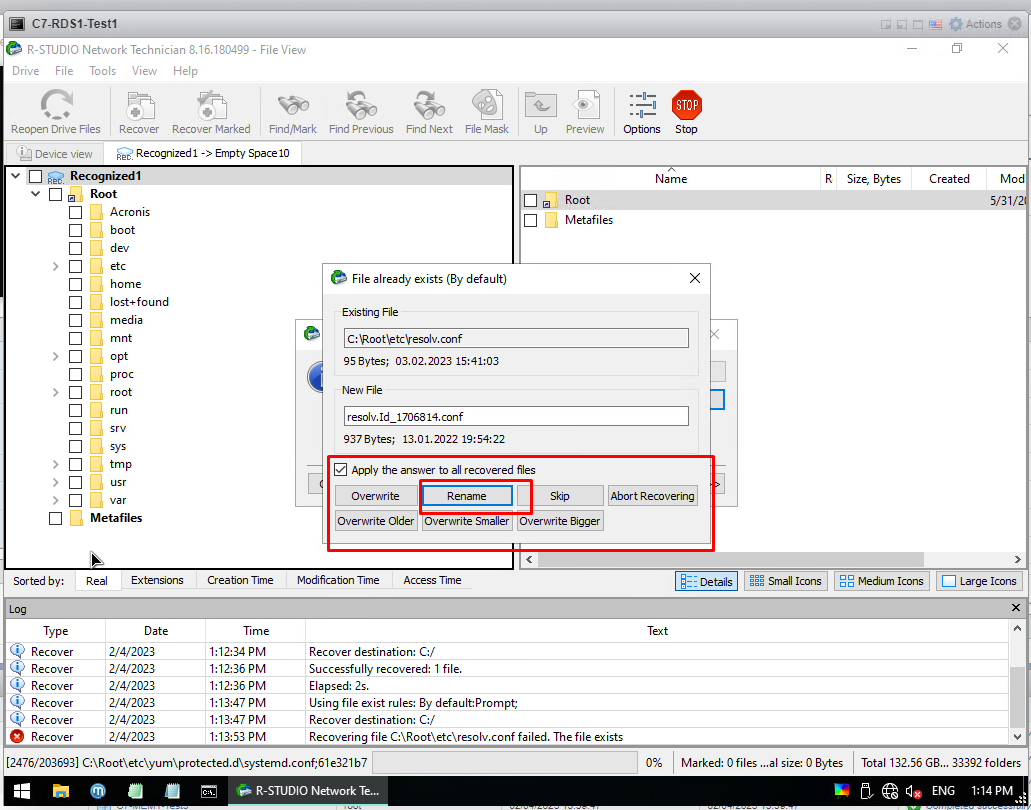
If you see a warning like the following during the process. Check the box "Apply the answer to all recovered files" and click Rename.
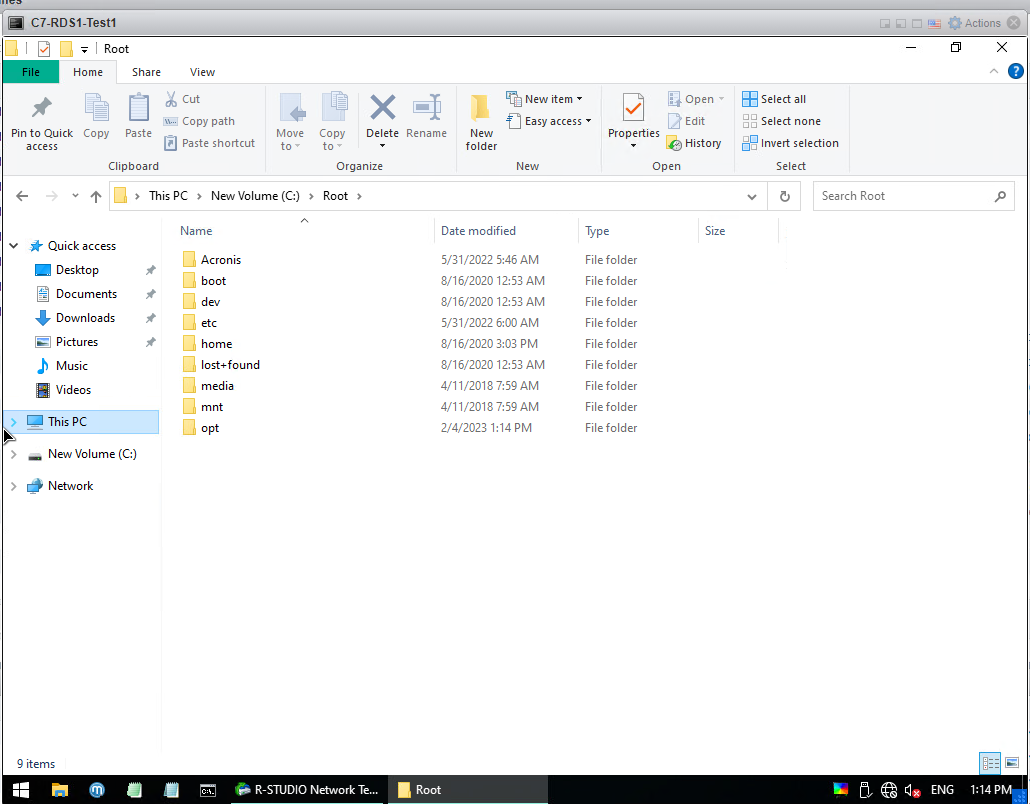
After the process is finished, you can see your files in Local Disk C.
After recovering your files, give this open Windows an IP address from the control panel. You can use it like a normal Windows. You can archive your files and upload them to a place like Google Drive from the browser, after activating the Remote Desktop, you can get your files by connecting, connect with Anydesk or teamviewer, or you can connect to an FTP with FileZilla program (pre-installed in Windows) and upload your files. This Windows is a version of Windows 10 that does not require installation and contains many programs. After recovering your files, you can use it like a normal Windows.